Repeatability and Reproducibility
Learning Objectives
After this lesson, you should be able to:
- Describe what reproducibility is
- Discriminate between reproducibility, replicability, and repeatability
- Explain why reproducible research is valuable
- Set up a software project with an environment
The so-called reproducibility crisis (see 1 , 2 , 3) is something you have probably heard about (and maybe one of the reasons you have come to FOSS). Headlines in the media (such as Most scientists can't replicate studies by their peers) definitely give pause to researchers and ordinary citizens who hope that the science used to recommend a course of medical treatment or design self-driving cars is sound.
Software Dependency Hell
Think for a moment about all the branching possibilities for how a computer could be set up:
- hardware: CPUs, GPUs, RAM
- Operating system: many flavors of Linux, MacOS, Windows
- Software versions: R, Python, etc.
- Package versions: specific R or Python packages, etc.
Simply trying to get the same setup as anyone else is difficult enough, but you can also run into all sorts of dependencies. Let's say you try to update a package to match the version someone else used for a project. However, after updating it, you realize you need to update 3 other packages. After that, you realize you need a newer version of R. You finally manage to get everything set up, but when you go back to a different project the next week, nothing works! All those updates made your code for your other project break. You spend a week fixing your code to work with the newer software, and you're finally done... but now your advisor gives you a dataset 10x the size and says you'll need to run it on the cloud. You throw your laptop out the window and move to the woods to live the life of a hermit.
All jokes aside, dealing with software dependencies can be extremely frustrating, and so can setting stuff up on a remote location. It can be even more frustrating if you're trying to reproduce results but you don't actually know the entire software stack used to generate them.
Defining Reproducibility
Question
How do you define reproducible science?
Answer
In Reproducibility vs. Replicability, Hans Plesser gives the following useful definitions:
- Repeatability (Same team, same experimental setup): The measurement can be obtained with stated precision by the same team using the same measurement procedure, the same measuring system, under the same operatingconditions, in the same location on multiple trials. For computational experiments, this means that a researcher can reliably repeat her own computation.
- Replicability (Different team, same experimental setup): The measurement can be obtained with stated precision by a different team using the same measurement procedure, the same measuring system, under the same operating conditions, in the same or a different location on multiple trials. For computational experiments, this means that an independent group can obtain the same result using the author's own artifacts.
- Reproducibility (Different team, different experimental setup): The measurement can be obtained with stated precision by a different team, a different measuring system, in a different location on multiple trials. For computational experiments, this means that an independent group can obtain the same result using artifacts which they develop completely independently.
The paper goes on to further simplify:
- Methods reproducibility: provide sufficient detail about procedures and data so that the same procedures could be exactly repeated.
- Results reproducibility: obtain the same results from an independent study with procedures as closely matched to the original study as possible.
- Inferential reproducibility: draw the same conclusions from either an independent replication of a study or a reanalysis of the original study.
Discussion Question: How do these definitions apply to your research/teaching?
Work with your fellow learners to develop a shortlist of ways reproducibility relates to your work. Try to identify challenges and even successes you'd like to share.
Often, when we say "reproducibility" we mean all or at least several of the concepts the proceeding discussion encompasses. Really, reproducibility can be thought of as set values such as some laboratories express in a code of conduct, see for example Ross-Ibarra Lab code of conduct or Bahlai Lab Policies.
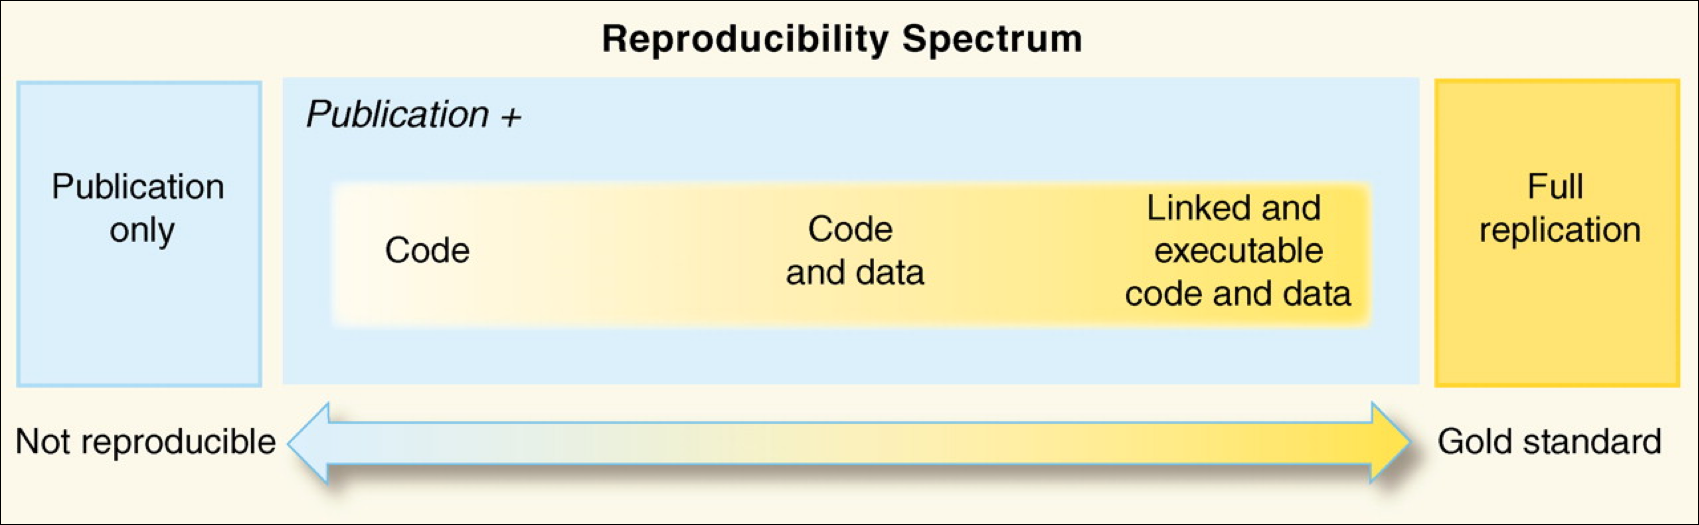
Reproducibility comes from our obligations and desires to work ethically, honestly, and with confidence that the data and knowledge we produce is done has integrity. Reproducibility is also a "spectrum of practices", not a single step. (See figure below from Peng, 2011).
Assuming you have taken in the potentially anxiety inducing information above, the most important thing to know is that there is a lot of help to make reproducibility a foundation of all of your research.
Repeatability: a first step
A big first step on the road to reproducibility is repeatability. In the context of computation, this means that you should be able to reliably generate the same results.
In many ways, this is the biggest hurdle to reproducibility, as it often requires the biggest leap in skills. You can think of repeatability in a few ways.
Discussion Question
Have you ever had any hurdles to reproducing your work?
- Have you ever run into a problem that prevented you from generating the same results, figures, analyses as before?
- Have you ever lost time trying to figure out how you (or a collaborator) got a particular result?
- What were the issues you ran into, and how might you have solved them?
Strategies for Improving Repeatability
Automation
In the process of making your work more repeatable, you will often be trying to reduce the amount of work you're doing "by hand". Reducing the human input necessary at each step of a project is a key to reliably reproducing the same results, but it can also help save you a lot of time in the long run.
Have you ever manually edited a figure for a manuscript, only to be asked to change something that negated all your manual edits? Well, in the short run, it may have been quicker to just tinker with the graph by hand, but in the long run, figuring out how to use code to generate the whole thing would have saved you time.
Automating tasks often comes with an up-front cost, but it is important for the eventual reproducibility of the work, and will often save you time in the short run.
Automation also tends to make tasks scale more easily (editing 10 rows of data by hand is fine, editing 10,000 is much harder), adapt to new scenarios, and extend to future projects.
Discussion Question
What are some tasks you have automated or want to automate?
- Have you ever successfully automated a task?
- Found a way to make something scale or take less time?
- What was the task, and how did you do it?
- Are there any things you wish you could automate?
- What are some barriers to automating them?
While we often think about writing scripts to clean data, run analyses, and generate figures, there are even more parts of a research project that can be automated. Here are a few examples:
- data validation
- model checking/validation
- software installation
- report/manuscript generation
- citation management
- email/GitHub/Slack notifications
- workflow itself (using things like make, Snakemake, Nextflow, targets)
Code can be thought of as a set of machine-actionable instructions, or instructions that we write for a computer to follow. What other sets of instructions do you have, either written down or in your head? How can you turn them into something machine-actionable?
Get off your own machine
More and more work is being done somewhere other than a personal computer. This could be an HPC cluster at a university or a cloud computing provider. "Cloud" just means somebody else is handling the computers, and you get to use them when you need to, typically for a price. Some 'cloud' options include: Binder, Colab, and Cyverse VICE and Github Codespace.
The take home message on Cloud is that it is a great way to make your work more reproducible, as you can share a link to your work, and anyone can run it without having to install anything.
Software Management
Have you ever tried to run a script, only to realize you had updated a package without knowing, and now the script doesn't work?
Package managers that create and manage custom environments can be extremely helpful in keeping software versions aligned with projects. Good examples of package managers are Conda and Pip.
In Python, it is common to use pip and a requirements.txt file, and in R, the renv package can be used to keep package versions stable within individual projects.
Conda: a GREAT Environment and Package Manager
Conda is an open-source package management system and also an environment management system. This means that it helps manage libraries and dependencies within different projects and can isolate different versions of packages and even Python itself into different environments to maintain project consistency and avoid conflicts between package versions.
Here's a breakdown of what Conda offers:
-
Environment Management:
Conda allows users to create isolated environments for their projects. Each environment can have its own set of packages, dependencies, and even its own version of Python. This ensures that different projects can have their own specific requirements without interfering with each other. It allows for consistent and reproducible results across different systems and setups
-
Package Management:
Beyond managing environments, Conda is also a package manager. It can install specific versions of software packages and ensure that all dependencies are met. While it's commonly associated with Python, Conda can also manage packages from other languages. You can search for packges at https://anaconda.org/.
-
Cross-Platform:
Conda is platform-agnostic. This means you can use it across various operating systems like Windows, macOS, and Linux.
-
Repository Channels:
Conda packages are retrieved from repositories known as channels. The default channel has a wide array of commonly used packages. However, users can add third-party channels, such as "conda-forge", to access even more packages or specific versions of packages. You can specify the channel by using the
-cflag when installing packages. -
Integration with Anaconda:
Conda is the package and environment manager for the Anaconda distribution, which is a distribution of Python and R for scientific computing and data science. However, Conda can be used independently of Anaconda.
Conda comes in two different flavours: Anaconda and Miniconda. Whilst both have the same Conda engine, Miniconda is smaller is size and contains only necessary packages (~500MB), whilst Anaconda comes with everything Miniconda has and more software modules (~2.5GB).
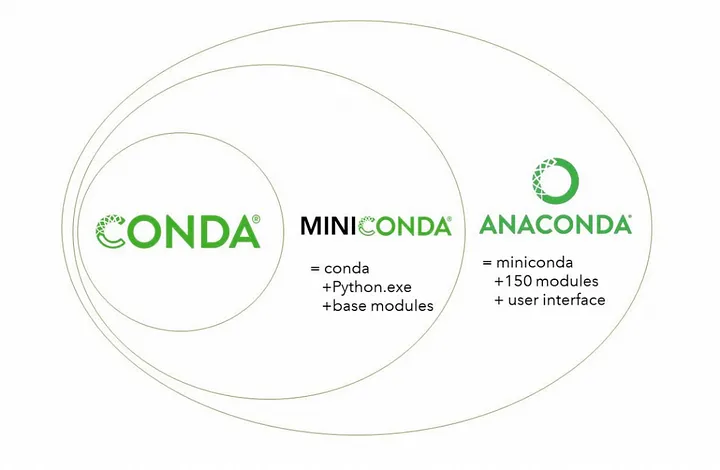
Taken from Getting Started with Conda, Medium.
Tip: slow Conda? Try Mamba.
Conda is known to take time processing some software installation. A solution is to use Mamba, a reimplementation of Conda in C++ for quicker queries and installations. Mamba is then invoked by using mamba instead of conda (whilst keeping options and the rest of the command synthax the same).
The quickest way to install mamba is with conda install -c conda-forge mamba, or follow the official installation documentation here.
Automation: Workflow Management with Nextflow and Snakemake
Workflow management is key to automation: it helps with bridging the gap between software, creating useful pipelines that help extracting information from data. Two examples of workflow management system popular (but not restricted to!) within the field of Bioinformatics are Nextflow and Snakemake.
Both workflow managers are powerful tools that tackle reproducibility and scalability, however the two have some key differences:
| Feature | Snakemake | Nextflow |
|---|---|---|
| Language style | Python-based DSL* | Groovy-based DSL* |
| Execution Model | Rule-based | Dataflow-driven |
| Parallelization and Resource Management | Implicit parallelization, limited resource management | Explicit parallelization, more flexible resource management |
| Integration | seamless with Python | seamless with Java** |
* = Domain Specific Langauge
** = No, it does not mean you need to learn Java
Although there are differences between the two workflow managers, there are a number of features which both share:
- Available on all OS
- Well integrated with Conda
- Support the use of Containers
- Deployable on HPC systems
- Integrated error reporting
- Well established communities***
*** = It should be noted that Nextflow has a community driven repository, nf-core, where people can upload their Nextflow pipelines for others to use. Power to the people!
Both are incredibly powerful when it comes to creating pipelines, ultimately the choice on which to use depends on you (and the goal of your project).
Here are a couple of script examples for each workflow manager. Although different, the examples try to
- Download a genome
- Align reads using BWA (Burrows-Wheeler Aligner tool)
- Gather aignment statistics using Samtools (Sequence Alignment/Map)
Snakemake:
# Snakefile

# Define rule for downloading reference genome
rule download_reference_genome:
    output:
        "reference_genome.fa"
    shell:
        "wget http://example.com/reference_genome.fa"

# Define rule for aligning reads to the reference genome using BWA
rule align_reads:
    input:
        "reference_genome.fa",
        fastq="data/{sample}.fastq"
    output:
        "aligned/{sample}.bam"
    shell:
        "bwa mem {input.reference_genome} {input.fastq} | samtools view -b - > {output}"

# Define rule to aggregate alignment statistics
rule aggregate_stats:
    input:
        expand("aligned/{sample}.bam", sample=config['samples'])
    output:
        "alignment_stats.txt"
    shell:
        "samtools flagstat {input} > {output}"

# Define samples
configfile: "config.yaml"
Notice how in the Snakefile above, there are a set number of rules that define input, output and commands.
Nextflow:
// main.nf

params.samples = ['sample1', 'sample2', 'sample3']

// Define process to download reference genome
process download_reference_genome {
    output:
    file('reference_genome.fa')

    script:
    """
    wget http://example.com/reference_genome.fa -O reference_genome.fa
    """
}

// Define process to align reads using BWA
process align_reads {
    input:
    file(reference_genome), file(fastq) from fastqs

    output:
    file("aligned/${sample}.bam")

    script:
    """
    bwa mem ${reference_genome} ${fastq} | samtools view -b - > aligned/${sample}.bam
    """
}

// Define process to aggregate alignment statistics
process aggregate_stats {
    input:
    set file(aligned_bam) from aligned_bams

    output:
    file("alignment_stats.txt")

    script:
    """
    samtools flagstat ${aligned_bam} > alignment_stats.txt
    """
}

// Define workflow execution
workflow {
    // Define input data
    Channel.fromPath("data/*.fastq").set { fastqs }

    // Execute processes in parallel
    download_reference_genome()
    align_reads(fastqs)
    aggregate_stats()
}
The Nextflow file "forces" you to know what you are expecting prior to execution by first defining what you want processes you need before defining the workflow script.
Although not shown here, Nextflow uses "Channels" to help with workflow execution. A channel can have one or more defined processes, but it can "wait": these processes wait until the input is ready before executing, thus creating the possibilty of an asynchronous processing pipeline (and parallel processing!). This is also what makes Nextflow able to manage resources better than Snakemake (the processes in "inactive" channels do not use resources until they are needed).
Reproducibility Tutorial
This section is going to cover a short tutorial on reproducibility using software, tools and practices discussed today and throughout FOSS.
OS of choice
This tutorial will be performed using the CyVerse CLI (Command Line Interface). However, if you'd like to use your own computer feel free to! If you're on Mac or Linux, open your terminal; If you're on Windows, use the Windows Subsystem for Linux (WSL)
How to Scroll in Cyverse(Tmux) Cloud Shell
If you're using the Cyverse Cloud Shell, you can scroll up and down by pressing Ctrl + b and then [ to enter scroll mode. You can then use the arrow keys to scroll up and down. Press q to exit scroll mode.
Tutorial Goals
- Run a small workflow using NextFlow
- Understand best practices for reproducing a workflow
- Apply FOSS procedures in order to enable easiness of reproducibility
Prerequisites
What you'll be using:
Installable through Conda/Mamba:
Installabe through Pip:
What's a Conda and how do I install it?
Conda is a popular tool for installing software. Typically software you want to use requires other software (dependancies) to be installed. Conda can manage all of this for you. Each available Conda package is part of a “recipe” that includes everything you need to run your software. There are different versions of Conda, including some specific for bioinformatics like Bioconda.
The CyVerse CLI already comes with Conda installed; Please follow these steps in order to install MiniConda (the lightweight version of Conda) on your system.
For the appropriate installation package, visit https://docs.conda.io/en/latest/miniconda.html.  Note: If you are using the WSL, install the Linux version!!
# Download conda and add right permissions
wget https://repo.anaconda.com/miniconda/Miniconda3-py39_4.12.0-Linux-x86_64.sh     # Modify this to match the OS you're using.
chmod +x Miniconda3-py39_4.12.0-Linux-x86_64.sh

# install conda silenty (-b) and update (-u) and initial conda run
./Miniconda3-py39_4.12.0-Linux-x86_64.sh -b -u
~/miniconda3/bin/conda init

# Restart bash so that conda is activated
source ~/.bashrc
You'll be able to tell when conda is active when next (base) is present next to the to the shell prompt such as
(base) user@machine
Conda should now be installed and can be used to install other necessary packages!
When you start a Cyverse Cloud shell, it will start you in the directory:
/home/user/work
cd home
cd <username>
y when prompted).
conda create --name myenv
Activate your new environment with
conda activate myenv
You can see the list of environments you can activate by doing
conda env list
Package management with Conda
We are going to to use conda to install Mamba, NextFlow, Salmon and FastQC.
# Activate Conda using
conda activate

# Install Mamba
conda install -c conda-forge mamba
You can either use the anaconda website to search for packager, or use the conda search feature (but also, Google is your best friend.)
Makes things faster with Mamba
Mamba is a reimplemetation of Conda using the C++ language, allowing for much quicker Conda experience. The tutorial is going to use Mamba instead of Conda, but you can always replace mamba with conda!
Conda channels
Conda operates through channels, specififc repositories where packages are stored. Specific packages sometimes may appear in multiple channels, however it is always helpful to specify a channel with the -c flag.
Install Nextflow and verify its installation with the following commands:
# Install NextFlow
mamba install -c bioconda nextflow=22.10.6     # Press y when prompted with [Y/n]!

# verify the installation
nextflow -version
Now that you know how to install packages with Conda/Mamba, install Salmon and FastQC.
Installing Packages
As an exercise, install Salmon and FastQC using Conda/Mamba.
Need a hand?
mamba install -c bioconda salmon
mamba install -c bioconda fastqc
Or you can do it with a single line (doable if packages are from the same channel)!
mamba install -c bioconda salmon fastqc
You can view the installed conda packages by doing
conda list
In order to make your environment reproducible, conda allows you to export your environment.
conda env export > my_conda_env.yml
Package management with Pip
Pip works similarly to Conda, as Pip is the package management supported by the Python Software foundation. If you use Python for your work it is likely you have installed packages using Pip.
We only have to install a single package required for this tutorial, MultiQC. To install MultiQC using Pip, do:
pip install multiqc
Similar to Conda, you can export your pip environment by doing
pip3 freeze > my_pip_env.txt
Why pip3?
pip3 freeze > my_pip_env.txt is used to export the pip environment such that it is readable for Python 3. If you want to export an environment for Python 2, you can use pip freeze > my_pip_env.txt.
Conda exports your Pip environment as well
Exporting your environment using Conda (conda env export > my_conda_env.yml) will ALSO export your pip environment!
Workflow Tutorial using Nextflow
...what are we doing?
In this tutorial (now that we have set up the environment, repository and pushed our first commit) we are going to:
- Index a transcriptome file and quantification of DNA reads (using Salmon).
- Perform quality controls (with FastQC).
- Create a MultiQC report.
I Don't know DNA stuff, can I still do this?
Absolutely yes! This tutorial is supposed to introduce you to the process of reproducibility using GitHub repositories, package managers and workflow managers! You do not need to understand what each file is as this is meant to show how to make your science reproducible. Focus on understanding the process and theory behind the tutorial rather than the files themselves .
Nextflow is a workflow manager, similar to Snakemake. For this tutorial, we decided to use Nextflow as it is easier to learn, more intuitive and user friendly than Snakemake.
Download the required files using wget and tar to decompress them
wget -O nf_foss_tut.tar.gz https://github.com/CyVerse-learning-materials/foss/blob/mkdocs/docs/assets/tutorials/nf_foss_tut.tar.gz?raw=true
tar -xvf nf_foss_tut.tar.gz
We can now look at the decompressed directory structure by using tree nf_foss_tut (if you don not have tree installed, you can install it with sudo apt-get tree or mamba install -c conda-forge tree).
.
├── nf_foss_tut
│   ├── data
│   │   └── ggal
│   │       ├── gut_1.fq
│   │       ├── gut_2.fq
│   │       ├── liver_1.fq
│   │       ├── liver_2.fq
│   │       ├── lung_1.fq
│   │       ├── lung_2.fq
│   │       └── transcriptome.fa
│   ├── example_script.nf
│   ├── script1.nf
│   ├── script2.nf
│   └── script3.nf

2 directories, 11 files
Files information
- Scripts 1 through 3 (
script<number>.nf) andexample_script.nfare the NextFlow files <file>.fqare fastq files, containing DNA sequences and quality scorestranscriptome.fais all of the RNA data from the organism (G.gallus)
Let's look at one of the NextFlow files (.nf)
Understanding the Nextflow synthax
Nextflow is powerful workflow manager as it can be deployed on HPCs and Clouds. However, it does require a little effort in order to understand its synthax.
The synthax is broken down into:
- Defining parameters early
- Defining Processes to be executed
- Defining Channels (blocks that work asynchronously that encapsulate other processes)
More complex scripts include operators (channel manipulation) and executors (to run things on the cloud and HPC); Nextflow can also be used to run and orchestrate containers.
As a good example, let's look at example_script.nf:
/*
    * pipeline input parameters
    */
    params.reads = "$baseDir/data/ggal/gut_{1,2}.fq"                                        #
    params.transcriptome = "$baseDir/data/ggal/transcriptome.fa"                            # The parameters are set early in the script
    params.multiqc = "$baseDir/multiqc"                                                     #
    params.outdir = "results"                                                               #

    println """\                                                                            #
            R N A S E Q - N F   P I P E L I N E                                             #
            ===================================                                             #
            transcriptome: ${params.transcriptome}                                          # Print statement that will show once the script
            reads        : ${params.reads}                                                  # is executed
            outdir       : ${params.outdir}                                                 #
            """                                                                             #
            .stripIndent()                                                                  #

    /*
     * create a transcriptome file object given then transcriptome string parameter
     */
    transcriptome_file = file(params.transcriptome)                                         # Convert input file to string

    /*
     * define the `index` process that create a binary index
     * given the transcriptome file
     */
    process index {                                                                         # First process, named "index"
    conda "bioconda::salmon"                                                                # Defines what package is necessary
                                                                                            #
    input:                                                                                  ##
    file transcriptome from transcriptome_file                                              ##
                                                                                            ## Defines the input and output of the process
    output:                                                                                 ##
    file 'index' into index_ch                                                              ##
                                                                                            #
    script:                                                                                 #
    """                                                                                     #
    salmon index --threads $task.cpus -t $transcriptome -i index                            # Command to execute
    """                                                                                     #
    }                                                                                       #


    Channel                                                                                 # Channels allows for scripts to work asynchronously, without waiting for received process.
    .fromFilePairs( params.reads )                                                          # .fromFilePairs method creates a channel emitting the file pairs matching a "glob" pattern provided by the user.
    .ifEmpty { error "Cannot find any reads matching: ${params.reads}"  }                   # .ifEmpty emits a value specified if no input is found.
    .set { read_pairs_ch }                                                                  # .set operator assigns the channel to a variable whose name is specified as a closure parameter.
                                                                                            #
    process quantification {                                                                # Second process, named "quantification"
    conda "bioconda::salmon"                                                                # Defines what package is necessary
    input:                                                                                  #
    file index from index_ch                                                                ##
    set pair_id, file(reads) from read_pairs_ch                                             ##
                                                                                            ## Defines the input and output of the process
    output:                                                                                 ##
    file(pair_id) into quant_ch                                                             ##
                                                                                            #
    script:                                                                                 #
    """                                                                                                     #
    salmon quant --threads $task.cpus --libType=U -i index -1 ${reads[0]} -2 ${reads[1]} -o $pair_id        # Command to execute
    """                                                                                                     #
    }
Nextflow has in-depth documentation that can be found here.
The 3 scripts' tasks are:
- Script 1 creates the transcriptome index file, necessary for downstream processes.
- Script 2 collects read files by pairs (fastq files come in pairs) and performs quantification.
- Script 3 performs quality control and summarizes all findings in a single report.
Script 1: Indexing transcriptome
Execute script 1
nextflow run script1.nf
The output will be something similar to
N E X T F L O W  ~  version 22.10.6
Launching `script1.nf` [admiring_banach] DSL1 - revision: 66baaf0091
R N A S E Q - N F   P I P E L I N E
===================================
transcriptome: /home/user/work/folder/nf_foss_tut/data/ggal/transcriptome.fa
reads        : /home/user/work/folder/nf_foss_tut/data/ggal/*_{1,2}.fq
outdir       : results

executor >  local (1)
[f0/0a72bc] process > index [100%] 1 of 1 ✔
work. Execute tree work to see what is inside the folder.
work
└── f0
    └── 0a72bc4d10dba1df2899b0449519e9
        ├── index
        │   ├── duplicate_clusters.tsv
        │   ├── hash.bin
        │   ├── header.json
        │   ├── indexing.log
        │   ├── quasi_index.log
        │   ├── refInfo.json
        │   ├── rsd.bin
        │   ├── sa.bin
        │   ├── txpInfo.bin
        │   └── versionInfo.json
        └── transcriptome.fa -> /home/user/work/folder/nf_foss_tut/data/ggal/transcriptome.fa

3 directories, 11 files
Script 2: collecting pairs and performing quantification
Execute with
nextflow run script2.nf -resume --reads 'data/ggal/*_{1,2}.fq'
The output should look like
N E X T F L O W  ~  version 22.10.6
Launching `script2.nf` [stupefied_swirles] DSL2 - revision: d3b0d0121c
R N A S E Q - N F   P I P E L I N E
===================================
transcriptome: /home/user/work/folder/nf_foss_tut/data/ggal/transcriptome.fa
reads        : data/ggal/*_{1,2}.fq
outdir       : results

executor >  local(3)
[c1/6ece54] process > index [100%] 1 of 1, cached: 1 ✔
[1b/10b8d5] process > quantification (1) [100%] 3 of 3 ✔
Script 3: QC and report
Execute with
nextflow run script3.nf -resume --reads 'data/ggal/*_{1,2}.fq'
The output should look like
N E X T F L O W  ~  version 22.10.6
Launching `script3.nf` [voluminous_goodall] DSL1 - revision: d118356290
R N A S E Q - N F   P I P E L I N E
===================================
transcriptome: /home/user/work/folder/nf_foss_tut/data/ggal/transcriptome.fa
reads        : data/ggal/*_{1,2}.fq
outdir       : results

executor >  local (4)
[c1/6ece54] process > index                   [100%] 1 of 1, cached: 1 ✔
[7a/4e9ce4] process > quantification (lung)   [100%] 3 of 3, cached: 3 ✔
[34/d60dbb] process > fastqc (FASTQC on lung) [100%] 3 of 3 ✔
[e9/e7c392] process > multiqc                 [100%] 1 of 1 ✔

Done! Open the following report in your browser --> results/multiqc_report.html
As you can notice, the report is an html file that can be opened with a browser. Navigate to this file in the Cyverse Data Store and open it.
Essential Exercise: Documenting your Work
Document your work. You should still be in your GitHub folder. Summarize your steps and work on your README file, and push your changes! This will ensure that your work and files are saved and have a valid version that you can come back to in the future if you ever require to.
Prerequisites
You will require the following in case you want to add code locally.
Create a GitHub account
Navigate to the GitHub website and click Sign Up, and follow the on screen instructions.
Installing Git
You can follow the official guidelines here: https://github.com/git-guides/install-git. Here we recommend how to install Git on your local machine.
Windows
These instructions are for Windows users NOT using WSL2. If you do have WSL2, follow the Unix instructions.
- Navigate to the latest Git for Windows installer and download the latest version.
- Once the installer has started, follow the instructions as provided in the Git Setup wizard screen until the installation is complete.
- Search and open Git Bash. From here, you should be able to run Git commands.
MacOS
- Install Homebrew (a package manager for MacOS): `/bin/bash -c "$(curl -fsSL https://raw.githubusercontent.com/Homebrew/install/HEAD/install.sh)"``
- Install Git:
brew install git
Unix
The following command will install git and all related packages on your Unix machine.
$ sudo apt-get install -y git-all
Additionally, you can choose between Generating a Personal Access Token or using SSH keys. This is useful if you want to work locally and push your changes to GitHub. We are going to cover this further in next week's lesson on Version Control.
Choice A: Generate a Personal Access Token
You can follow the official documentation on how to generate Tokens here. We discussed how to generate tokens in Week 0. Here's are quick steps you can follow in order to setup your account on your machine using tokens:
- On your coumputer:
- Clone your repository (
git clone <repository>) - Make changes where necessary, and add (
git add <changed files>), commit (git commit -m "<message on changes>") and push your changes (git push origin). - You should be prompted to logging in your GitHub account. Put your email but not your password. Instead, open your web browser and follow the steps below:
- Clone your repository (
- On GitHub:
- Navigate to your GitHub Settings (You can access your account Settings from the drop down menu where your account icon is, on the top right of the screen)
- Scroll to the bottom of the left hand side menu to find Developer settings and open it.
- Click Personal access tokens > Tokens (classic)
- Click Generate new token > Generate new token (classic). You might need to input your Authentification code if you have enabled 2FA.
- Give it a name, and all the scopes you require (tip: select all scopes and No Expiration), then click Generate Token. Copy the new generated Token
- Back on your computer:
- If you have been following the steps above, you should still be in your shell with GitHub still asking for your password.
- Paste your Token here, and you should be logging in. Your changes should then be saved to GitHub.
Choice B: Connecting via SSH
The process of connecting your computer to GitHub using an SSH key is more expedited (and probably less confusing).
As a setup step, see if your computer is already connected to GitHub by doing ssh -T git@github.com. If the response message is git@github.com: Permission denied (publickey). it signifies that your computer is not yet linked with GitHub. To link your computer to github to the following:
- Generate an SSH key with a level of encryption that you prefer:
ssh-keygen -t ed25519 -C <your github email>. This command generates an SSH key with ed25519 encryption (harder to crack!) and adds your email as "comment" (-C, will help recongizing the user adding the key). A number of additional questions are going to ask you where you'd like to save the key and whether you'd like to add a password for protection; unless you want to save it elsewhere, feel free to use the default options. Upon completion you should see something like this:Your identification has been saved in /c/Users/<user>/.ssh/id_ed25519 Your public key has been saved in /c/Users/<user>/.ssh/id_ed25519.pub The key fingerprint is: SHA256:SMSPIStNyA00KPxuYu94KpZgRAYjgt9g4BA4kFy3g1o <your github email> The key's randomart image is: +--[ED25519 256]--+ |^B== o. | |%*=.*.+ | |+=.E =.+ | | .=.+.o.. | |.... . S | |.+ o | |+ = | |.o.o | |oo+. | +----[SHA256]-----+ - Upon generating the ssh key, copy it. You can reveal it by doing
cat ~/.ssh/id_ed25519.pub. - In GitHub, go to your settings: click your account icon on top right, and from the drop down menu, select Settings and then SSH and GPG keys. Here, click on New SSH Key, where you can then paste the newly geneated key. Add a name reflecting your machine and save changes.
Optional: if you want to check if you successfully linked your computer to GitHub, do ssh -t git@github.com. You should receive the following message: `Hi
What if my files are too big?
You can always use a .gitignore, a file that within itself has defined what should be saved in GitHub when pushing a commit, and what shouldn't be saved. An alternative is to move your files outside of the respository that you're pushing ("stashing").
GitHub repository setup and documentation
Create a repository on GitHub to document your work:
- On GitHub, navigate to your account page and create a new repository (add a README to create structure!)
- Clone your repository locally with
git clone <repository_url>.git(find the url under the green Code button) - Navigate to your cloned repository with
cd <repository_name>. You should now be inside your repository. - Move your environemnt files into your repository with
mv ../my_conda_env.yml ../my_pip_env.txt .. - Modify your README to reflect the work so far, with meaningful comments (remember that the README is formatted with markdown, a guide to markdown here). A well documented document may look similar to:
# reproducibility-tutorial

This repository contains information about the reproduciblility tutorial from [FOSS 2023 Spring](https://foss.cyverse.org/06_reproducibility_i/#reproducibility-tutorial).

## Environment Setup

- Download conda and add right permissions
```
wget https://repo.anaconda.com/miniconda/Miniconda3-py39_4.12.0-Linux-x86_64.sh
chmod +x Miniconda3-py39_4.12.0-Linux-x86_64.sh
```
- Install conda silenty (-b), update (-u) and initial start
```
./Miniconda3-py39_4.12.0-Linux-x86_64.sh -b -u
~/miniconda3/bin/conda init
```
-  Restart bash so that conda is activated
```
source ~/.bashrc
```
- Install Mamba
```
conda install -c conda-forge mamba
```
- Use environment files in this repo to recreate tutorial env
```
mamba install -f <my_conda_env.yml>     # Will also install pip packages
```

## Obtaining tutorial files

Tutorial files avaiable [here](https://github.com/CyVerse-learning-materials/foss/blob/mkdocs/docs/assets/tutorials/nf_foss_tut.tar.gz?raw=true). Use `wget` to download appropriate files and decompress files with `tar -xvf`.
```
wget -O nf_foss_tut.tar.gz https://github.com/CyVerse-learning-materials/foss/blob/mkdocs/docs/assets/tutorials/nf_foss_tut.tar.gz?raw=true
tar -xvf nf_foss_tut.tar.gz
```

## Workflow tutorial using Nextflow
Steps of the nextflow tutorial will be added in future commits.
- Add, commit and push your changes
git add .
git commit -m "documenting the tutorial"
git push